Zergling Hat: Too Much Awesome
- Posted at
- .
- Updated at
- .
Hey all,

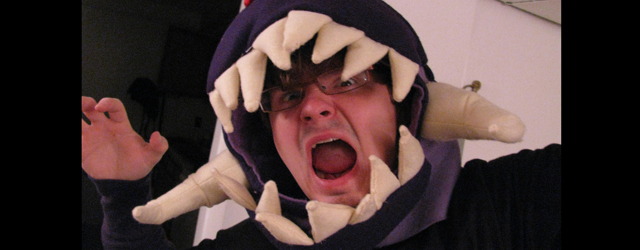
I ended up spending most of Halloween night posed like this. It's just too much fun to stand there and roar! You too can be this fearsome!
This post has been a long time coming. Yes, it is the unveiling of the most-awesome Zergling Hat ™!
The idea came to me around last June. To be honest, I can’t remember what sparked the idea. Most likely I was in the middle of a Starcraft 2 beta-gasm and decided that I needed to have a zergling costume. Why a zergling? Come on, what else is a zergophile like myself going to make? Nothing epitomizes the zerg than the zerging: it’s sneaky, super-fast, likes to chew on metal and people, and most importantly, it’s expendable. The perfect choice for showing my zerg pride.
While the original plan was to produce a pair of the hats (one for me, and one for my lovely girlfriend), we decided that it was taking too long and decided to stick with making just the one to start with. And that’s where we stopped, at least for now. However, I would like to share the process with all of you so that you all can make zergling hats of your own.
Disclaimer: I do not know the proper terminology for the construction; I am a costume-making noob. Sorry folks.

The base hood with the reinforcing pipe cleaners. This will be what all of the other pieces are attached to.
The hat is made from felt, pipe cleaners, batting, and thread. I toyed around with using a brown-red color scheme, but eventually settled on a purple-cream color scheme. About 95% of the sewing was done by hand, which made the construction take quite a long time: somewhere on the order of 40 hours. Although most of that time my attention was split between watching TV (The Muppets) and sewing.

The triangular plates overlap to give the hat a zergy feel. Here the plates are arranged in a way that shows how they will be attached.

The lower jaw was attached with about one-half of it hanging off of the hooded extrusion. Then you attach snaps to the hanging side and to the other hooded extrusion. There must be a better word for the jaw-bit than that.
- The hood was constructed by cutting two mirrored pieces of felt and stitching them together. The hood shape is from a pattern that we found online. The stitch conveniently forms a ridge that the plates will use to point upward.
- The hood was then reinforced with pipe cleaners in order to give it a more round shape. These pipe cleaners are held in position by a small section of felt that was sewed around them.
- The hat features seven armored plates, two for the jaws, and five for protecting the back of the head. Each of these plates is made from two roughly triangular pieces, sewed together, turned inside-out, and filled with batting. The plates are layered in a way that gives the entire hat a very nice shape, as well as a zergy feel. The plates vary in size based on how far back (away from the jaws) they are.
- Attached to the two jaws are fifteen teeth, each made from sharp triangular pieces that were sewed together and turned inside-out. I tried to make it so that the teeth would interlock (loosely) when the jaw was fastened on.
- The two tusks were attached to fill the space between the jaws and the neck plates. They were added to increase the fear-factor of the hat by 5.
- The lower jaw is sewed with about half of it off of the hood’s extrusion. This room allowed for snaps to be attached, so that the whole jaw could be snapped on and off easily. Three snaps were sewn onto both the opposite extrusion and the jaw itself.
- Diamond shaped eyes were stuffed and sewed onto the top to complete the hat. Such ferocity!
Equipping the hat is simple enough: the snaps make it easy to get on and off. Wearing the hat is considerably more difficult however, as the teeth and tusks interfere with vision and the felt is rather hot and coarse on the skin. The hat also tends to slip slightly either forward or backward. On the bright side, the fabric protects your ears from ambient noise, making it ideal for when you need to focus on a single task and do not want to be distracted. I wonder if I should develop a study-cap-zerging-hat version. Hmm. A project for another time.
Overall, it was a very fun project and I’m glad that I decided to do it. The total cost in materials was relatively low, but as I mentioned, the labor was quite intense. I don’t know how often I will go out wearing it, but it was good times to wear out to the bars for Halloween.

This Jack-o-Zerging is good for adorning a porch in lieu of carved produce... as well as being an awesome head ornament.
I would like to thank my wonderful girlfriend, without whom this project would’ve taken ten times as long and been a tenth as awesome. She helped so much with planning, gathering of materials, and the construction; it is her project as much as it is mine. She is amazing… it’s not just anyone who will sit down and sew a zergling hat with you. <3
Addendum: the zergling hat makes for one baller Jack-o-Lantern.
I hope that you all enjoyed this as much as I did making it! For the Swarm!
Till next time,
-S
Comments
kigadoe said: 20 November 2010 at 15:46
That’s a killer hat!
Sunhawk said: 21 November 2010 at 16:52
Why thanks! It is quite ferocious in my opinion. And took quite a bit of work to get done.
Jesse said: 20 August 2011 at 18:27
Hey! Can I possibly buy or borrow this magnificent piece of work from you?
Sunhawk said: 22 August 2011 at 04:30
Hi Jesse,
Thanks for the kind words! I’ll contact you privately to see if we can work something out.